This article contains affiliate links, which are marked with an asterisk. If you purchase something through these links, we may earn a commission.
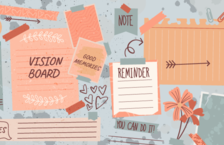
With all the various goal-setting techniques out there, vision boards really stand out from the crowd. These colorful, poster-sized visuals outline your aspirations and targets, and can be a powerful tool for helping you achieve success, in terms of both your personal development and your career goals.
Making a vision board is a creative process and there are few guidelines. Nevertheless, this article covers some tips on how to put one together so it will work best for you. We’ll also discuss what a vision board is, the benefits it can offer you, and the supplies you’ll need.
What is a vision board?
In the spirit of goals working best when they’re visualized, a vision board is exactly that: a visual manifestation of your targets and aspirations.
Vision boards are poster-sized creations that will illustrate (through images, cutouts and text) what you’re seeking to accomplish. They don’t follow prescriptive formats, and creating them is just as exciting as seeing the goals realized.
You can create a vision board for one goal or everything you’re working on. Once they’ve been created, vision boards work best when they’re displayed prominently for you to see on a daily basis.
Why you should use a vision board
Despite goal-setting being a very personal process, and one in which you have to find a system that works for you, vision boards can be instrumental in helping you achieve your targets. Here are the top five benefits to using vision boards:
1. It’s a creative process
Assembling a vision board — cutting out pictures, sticking them to cardboard, and drawing images — is a creative and cathartic process that might also be nostalgic, encouraging to think back to when we did similar things as children. The process has no rules and can be completed at your own pace. Therefore, it’s enjoyable and relaxing, and a great way to get your creative juices flowing.
2. It can help you make sense of your goals
Committing your goals to paper is a great way for you to make sense of them. Having our goals floating around our head can be stressful and unhelpful, but when we see our goals in front of us on a vision board, everything might become clearer. You can use the creative process in making a vision board to also help you organize your goals and career plan, and understand what is a priority and where to start.
3. It can motivate you for success
Visualizing goals can motivate us to achieve them. Vision boards are created with you in mind. They will appeal to your senses because the colors, text, images and layout have been curated by you. Therefore, whenever you look at your vision board, you’ll resonate with it and be motivated to achieve what has been assembled on there.
4. It provides direction
Vision boards are a powerful and striking reminder of where you want to get to. They should serve as a daily reminder of your aspirations. Given that half the battle (and fun) in creating a vision board is through you making it what you want it to be, then the visuals on there should provide a powerful direction to what you want to be working on from now until the future.
Vision boards are aspirational. Whereas your future self, life or career might not look exactly like how you have envisioned it on the board, it will be a strong source of motivation in pointing you where you want to be headed.
5. It can help you destress
Vision boards can help you destress in lots of ways. Firstly, the creative process involved in making one means that you might find harmony in assembling it. The process can be relaxing and harmonizing, and might be a welcome break from your busy day-to-day tasks.
Secondly, by helping you organize your thoughts and goals, vision boards can help you declutter your mind and assist you in focusing on the bigger picture, while making your aspirations seem a little more reachable. Finally, as you complete the goals on your vision board, you’ll find peace and calm from the sense of achievement and fulfilment that a vision board aims to provide.
What it should include
When it comes to what should be included on a vision board, you have creative freedom! Vision boards work best when they contain a lot of visuals. Most commonly, you can cut out images from magazines, printouts or posters that can be stuck to the vision board. You can add your own illustrations or graphics to them, and even your own photographs.
Text can be used, but typically this is best limited to inspiration and eye-catching career quotes and stylized, large-font text snippets that serve a concise and powerful purpose. You can use any colors you like and decorate it with other collage material such as sequins, feathers, glitter, textured card, tinsel, and so on. The choice is yours!
Supplies you’ll need
Despite the creative freedom involved in making one, you’ll need some specific materials to pull a vision board together. Here’s a list of the main things that you’ll need to make one:
- Vision board background such as poster paper, card or a corkboard*
- Glue, tape or pins to stick things to the vision board
- Scissors*
- Plain paper for drafting out ideas
- Marker pens*, and pencils for drafting
- Material for your content, such as online images, photos, magazines, quotes or stencils
- Online design programs like PowerPoint, and a laptop, if you want to make your vision board virtual
- Cover, frame or clear spray-on adhesive for when your vision board is complete
How to create a vision board
We’ve already mentioned how there’s no set process to creating a vision board, and this is why making one is so much fun! That said, there are some fundamental things you need to be aware of to ensure the creation process goes as smoothly as possible, and for the vision board to achieve its core purpose. Here are 12 steps to create a meaningful vision board.
Step 1: Reflect on where you are and how you’re doing
The concept of reverse thinking is essential when it comes to planning out your vision board. By understanding your purpose and where you want to be, you’re laying strong foundations to creating powerful goals that your vision board will bring to life. Consider writing out a personal SWOT analysis or “Stop, Start, Continue” diagram to understand what’s going on in your personal or professional life and what you feel you need to focus on.
If you have time, consider keeping a reflective journal, writing in it every day, to develop a clearer picture about how things are going. You don’t need to develop “solutions” to any challenges you have discovered at this stage; you will do this next!
Step 2: Journal your goals
Now that you know where you are, you’ll want to spend time writing your goals. Here, you’ll create goals based on what you want to achieve. These can then be transposed into your vision board. It’s good practice to make goals — whether they're personal or professional — SMART. SMART goals are Specific, Measurable, Achievable, Relevant and Timely. If you get this stage of the process right, then the vision board you create will be perfectly aligned to your future.
Step 3: Collect the resources you will need
To make a vision board, you’ll need a lot of craft materials, such as large and durable poster paper or card, scissors, tape, glue, and pens or paints. It will really help the creation of your vision board if you prepare this ahead of time.
Putting together a vision board is a creative process that would require headspace and time, and you don’t want to be distracted from this process if you have to stop every so often to find or buy the materials that you didn’t realize you needed. Create a checklist of what you need, collect it all, and then get creating.
Step 4: Find and curate the images and words for your vision board
One of the most time-consuming but fun parts of the vision board process is to find the content that you need for your vision board. This would primarily be collecting or cutting pictures or art that you wish to incorporate into the vision board, and for this you would need magazines, booklets and any other media that would give you the content you require.
You don’t always have to buy media to collect it; you can ask around on social media to see if people in the area can provide you with some, or ask in coffee shops, hairdressers or other businesses with waiting rooms if they have anything. You can also find images online and print these off.
You’ll want to spend decent time collecting and reviewing your resources, and if you don’t find what you want, broaden your search. Don't rush this stage of the process; your vision board is only as good as the images you use!
Step 5: Draft out your vision board
Next, plot out what your vision board is going to look like. This is an important step because it will stop you from rushing into a certain design, sticking everything down, and then being unable to change it afterwards if you have second thoughts. Using your collected content, draft out on scrap paper some sketches of what the vision board might look like.
You might want to create two or three different drafts. Once you have done this, it would be a good idea to leave the drafts overnight and revisit them the next day to see how you feel. Once you have settled on a draft you genuinely like, it’s time to create the real thing.
Step 6: Assemble your vision board
Here comes the moment you’ve been waiting for: you’re going to assemble your vision board!
Find some free time in your diary and a quiet, decluttered space to do this effectively. Here, you’re going to trim the pictures you have and assemble them onto the poster paper. At this stage, don’t stick anything down; you want to ensure you’re happy with the arrangement first (maybe use adhesive tack to roughly position everything).
If you’re planning to add illustrations or write on your vision board, practice these on scrap paper before adding them to the final assembly.
Step 7: Glue everything together
Once you’re happy with the final arrangement, it’s time to make your vision board permanent! Glue everything down and draw or write your final illustrations and text. Your vision board is now almost complete!
Step 8: Add final flourishes
You might want to add some final details and enhancements to make your vision board truly unique and something that is representative of who you are and your aspirations. These could be colored outlines to the images, quotes, drawings or patterns to fill in any empty space, or collage material or other funky additions. You might also want to add more content or aspirations as you go. Finally, if you want to, you can apply a topcoat adhesive to give you vision board some gloss and a professional feel.
Step 9: Makes copies of your board
Give yourself a huge pat on the back: your vision board is now complete!
Your vision board should be displayed somewhere where you’ll always see it, but it might be helpful to copy it so you can always keep it near you. Consider either photocopying your vision board so you can have a few prints: one at work and one at home, for example.
You might also want to scan it so you have an electronic copy that can be stored on your phone or desktop. Think about creating smaller copies that can be displayed as photos around your home or where you work.
Step 10: Display your vision board
However many copies of your vision board you create, you need to display it prominently so that you’ll never fail to notice it. At the same time, vision boards are very personal things, and never feel pressured to have it displayed somewhere publicly. Some good places at work for you to display your vision board could be on your desk, on your cubicle wall or in your office if you have one. You could even set it as your background on your laptop!
At home, vision boards might be most visible in a home office, on the wall in a hallway, or in the kitchen. What is most important is that you have a think about where you walk or visit the most, and display the vision board prominently in these locations.
Step 11: Notice your vision board
Do all you can to notice your vision board every day you pass by it. Take a few moments each day to stop at your vision board and review it to remind yourself to keep focused on the goals. This is easier said than done, and you might want to set yourself a daily reminder in your phone or calendar to do this. Some people like to ensure their vision board grabs their attention by surrounding it with lights or some other decoration that makes it hard to ignore.
Step 12: Revisit your vision board
By this stage, you should have a well-crafted vision board that is prominently displayed and supporting you as you work on your goals. As and when you achieve what’s on your vision board, don’t forget to celebrate success!
You should review your vision board from time to time. If you have achieved what’s on there, or your goals have changed, then maybe it’s time to make a new one. You might also want to edit your vision board as you go so it becomes an evolving document. Whatever you decide to do, check in on your board once every so often to see if it’s still relevant to you and your aspirations.
Key takeaways
Putting together a vision board is a fun and creative exercise, as well as one that can directly contribute to your future and success. When creating a vision board, keep in mind these key points:
- There is no set process to create a vision board.
- Vision boards work best when they’re visual and include minimal (but impactful) text.
- Get all the materials you need to create your vision board before you start it.
- Embrace the creative process when creating your vision board: this is half the fun!
- Have a good idea of your goals before you start work on your vision board, and practice reverse thinking to support this.
- Ensure you commit to your vision board by looking at it daily, updating it when needed, and celebrating success when you have achieved your goals.
Creating a vision board is a rewarding and creative way of setting goals. Keeping the above tips in mind will ensure that you get the most out of it. Good luck!
Got a question or want to share your own tips with us? Let us know in the comments section below.